#tool-specific tutorials
Explore tagged Tumblr posts
Visit Tumblr Blog
Explore Tumblr blogs with no restrictions, modern design and the best experience.
Last Seen Tumblr Blogs


Fun Fact
Kazakhstan’s Minister of Communications and Informatics has blocked the Tumblr site because it contained 60 sites of terrorism, extremism, and pornography in 2015.
Text
Unlock Your Creative Potential: Learn Multimedia Skills
If you’ve ever dreamt of creating visually stunning art, immersive animations, or compelling videos, now is the perfect time to start! Whether you’re a beginner or looking to expand your expertise, there are countless resources to help you on your journey in the world of multimedia. In this article, we explore a variety of learning avenues, from step-by-step guides to specialized courses, helping…
#Adobe Creative Suite#art#beginner-to-advanced courses#Blog#creative potential#creativity#engagement#just release#learning multimedia#multimedia skills#Post#step-by-step guides#tool-specific tutorials
0 notes
Text
way-too-ambigious puzzle/mystery game where the sequence of events is based in unreality
#like a crossover between portal and mystery games like dangan (I say this with acknowledgement that I've barely played any mystery games)#but dang case 5 is still my favourite for the use of luck bc every other case is grounded in reality#they just use some creative thinking of available resources but everyone knows how gravity or whatever works#and yet the luck use makes total sense. it's another resource/a rule that only applies to one specific character#but also doesn't come out of nowhere in that case 1 introduced it too but as a passive effect as opposed to something actively used#(though I'd also argue that contradictory to him playing it off as misunderstanding the rules of the game#the roulette scene was instead an instance of ko.maeda completely understanding how his luck actually works and manipulating that#to ensure he gets the least likely outcome and survives. but that's beside the point here)#actually i'm not even sure if a *whole* game based off stuff like that would be fun skldfhsd but I love portal a ton and it's#kinda the same idea as portal: introduce a new tool to the world#and teach the player how to use it; how to think with it; tutorialize it within the world#could be a true puzzle/mystery mix of having the player solve puzzles with the tool then later kinda do the inverse#of presenting peices of a solved puzzle and having them connect the dots of what happened to solve it#......mystery games being inverse puzzle games. is that anything? I should look into analysis of mystery games as a genre at some point#rip the fact one of the main barriers for me actually making a game is all the art assets needed. also music#but regardless jots this sorta thing down as an idea; unrealistic tools and the overlap between puzzle games vs mystery games#truly i should play more mystery games bc of how much fun I'm having with this one but alas I know if I play too many I'll get bored#this one's fun bc I love the over all story and all the mystery solving aspects is fun for being novel gameply dressing on top#probably just gonna return to studying math/phys once we're done the game bc it's a similar problem solving rush but more relevant to stuff#personal talk
0 notes
Note
How did you learn to draw fat bodies but still keep it cartoony? I love how you draw different types of bodies and make them all seem normal instead of certain body types sticking out like a sore thumb next to others. I struggle to draw fat bodies without it looking weird with the rest of my art. Do you have a specific tutorial you followed or something?
This is a really good question! I'm glad you like my depictions of different body types, i worked really hard to get better at that so im happy folks enjoy em!! I didn't actually learn from a book or tutorial, it was mostly looking at fat bodies IRL and learning to incorporate those features onto what I already drew. As it turns out, we're all human, so if you understand the anatomy enough to draw a skinny person, you have the tools to understand the anatomy of a fat person.
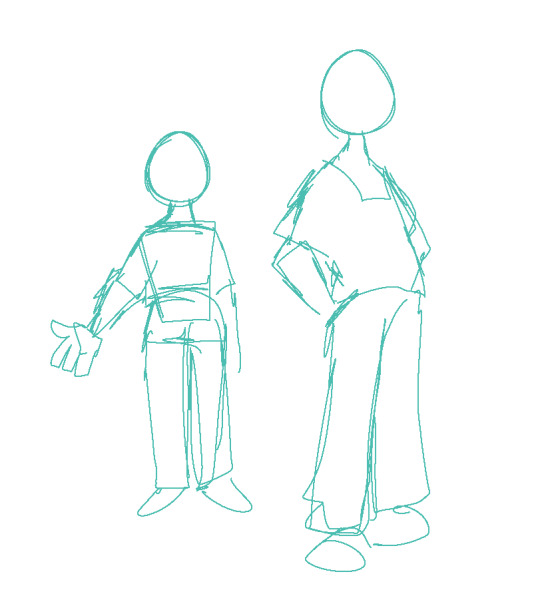
So, like, here, this is my sketch of someone with a very average build. If I were to draw a fat body, I would still use all the basic principles I use here. One mistake I think folks run into is "isolating" parts, which can lead to things like this
which isn't necessarily bad, but if its not what you're going for, the issue is pretty apparent. Weight affects ALL of the body, not just the stomach or the face or the limbs. If you think about how that weight affects everything in tandem then you can start drawing fat bodies that work more in your style.

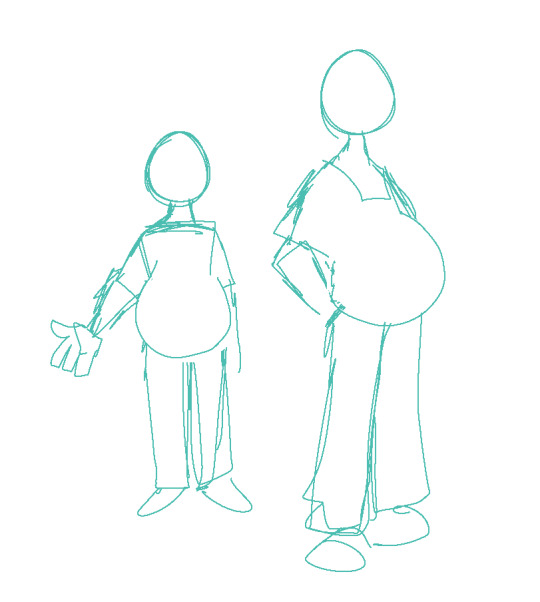
for this, this is the same quick sketch using the same pose and principles as the first one. but! I allowed the weight to be distributed across the body. Notice how the legs, belly, arms, etc all got thicker? The key to drawing fat bodies and making them look like they fit is allowing that weight to affect everything. without it, it just looks like you're adding on features to someone rather than considering everything at once.
my other tip is: don't be scared! things like fat arms or chins or bellies or stretch lines are not something that's bad to depict. if you want to draw fat bodies, you gotta not be scared to draw things the way they are. someone having a fat body is not bad, and you drawing that fat body is not bad either. Experiment! To me, art is about representing ideas, and the only way to get better is to experiment with how you represent those ideas. I'm by no means an expert, and I think you can also get a ton done by looking for resources aside from me, but I hope this helps, and have fun!!
5K notes
·
View notes
Text
so, you wanted to start bookbinding?
so @princetofbone mentioned on my post for "factory settings" about wanting to know more about the binding style that i used for it. so i thought i might make a post about it.
i was as terrible as i always am for taking in progress shots, but i can link you to the resources i used in order to make my book. i would also like to point out that "factory settings" is my 120th bind, and i have been doing bookbinding as a hobby for just over 3 years now. unfortunately this means some of the methods that i used for that bind aren't particularly beginner friendly, just in terms of the tools and methods i have used, but i would love to point you in the right direction when it comes to resources. i dont say this to sound pretentious which i fear i might come across, just so that youre fully informed. getting into this hobby is fun and rewarding, but it can definitely be intimidating.
with that caveat, heres a list of links and resources that i have used for bookbinding in general, with additional links to methods i used specifically in regards to this bind.
ASH's how to make a book document. it gives you a great introduction into typesetting fics (where you format the text of fics to look like a traditionally published books) and then turning them into a case-bound book (the style i used for "factory settings"). it is comprehensive, and explains how to use microsoft word to do your bidding. it was invaluable to me when i was just starting out! currently i use affinity publisher to typeset/format my fics for printing, but i only bought and learned how to use that after i had been binding books for a year and a half. i made some beautiful typesets with word, and some of my close friends use it still and design stuff that i never would be able to in my wildest dreams (basically anything by @no-name-publishing)
DAS Bookbinding's Square Back Bradel Binding. a great style to do your first bind in! this method requires, when making the case, to attach the cover board and the spine board to a connecting piece of paper, which makes it so much easier to match the size of the case to the size of the text block (your printed out and sewn fic). using this method is what allowed me to get much more accurately fitting cases, and made me much more confident with the construction of the books i was making. a well-made book is something that is so wonderful to hold in your hands!
DAS Bookbinding's Rounded and Backed Cased Book. This is the specific method that i used to create my bind for "factory settings"! even before i could back my books, i found that watching DAS's videos in particular helped me see how books were traditionally made, and i was able to see different tips and tricks about how to make nicer books.
Book Edge Trimming Without... i trim the edges of my text block using my finishing press and a chisel i have sharpened using a whetstone and leather strop with buffing compound on it. i follow the method for trimming shown in this video!
Made Endpapers. i follow this method for my endpapers, as i used handmade lokta endpapers, and they can be quite thin, but they look beautiful! i used "tipped on" endpapers (where you have your endpaper and then put a thin strip of glue on the edge and attach it to your text block) i used for a very long time before this, but these feel like they are much more stable, as they are sewn with your text block.
Edge Sprinkling. this is the method that i used for decorating the edges of my text block. but the principle is basically clamping your text block tight and then sprinkling the edges. i do not believe you need to trim the edges in order to do sprinkles on the edges, and that's what makes it accessible! i personally just use really cheap acrylic paint that i water down and then flick it onto the edges with my thumb and a paint brush.
Double-Core Endbands. i sew my own endbands, which i followed this tutorial for. that being said, it's kind of confusing, and this video is a bit easier to follow, but it is a slightly different type of endband.
Case decoration. i used my silhouette cameo 4 to cut out my design for "factory settings" in htv (heat transfer vinyl). i also used my cameo 4 to cut out the oval of marbled paper on the front, as i honestly didn't want to try my hand at cutting an oval lol. i also glued some 300 gsm card with an oval cut out of the centre of it onto the cover before covering it with bookcloth, to get a kind of recess on the cover. i then glued the oval of marbled paper onto the top of the recessed area once it was covered with bookcloth, so that it was protected. the images i used were sourced from a mix of rawpixel, canva and pixabay. a more accessible way to get into cover decoration is by painting on a design for your cover as described in @a-gay-old-time's tutorial just here. or even doing paper labels, which look classy imo.
physical materials. sourcing these will depend on your country. i am located in australia, and have compiled a list with some other aussie bookbinders of places to buy from. here is a great post describing beginning materials for getting started binding.
@renegadepublishing. this tumblr is great! its what got me started bookbinding, and being in the discord has been inspiring, motivating, and honestly just one of the best online experiences i have ever had. it is full of resources, and most people in there are amateur bookbinders, with a couple of professionals thrown in. the discord is 18+, and anyone can join!
i'm sorry this post got so long, but i hope that this has a lot of information for you if you would like to get started bookbinding. its one of the best hobbies ive ever had, and i genuinely believe i will have it for the rest of my life.
4K notes
·
View notes
Text
90s/2000s SOFT GLAM

PRODUCTS
Primer
Baby Powder
Tinted Moisturiser or a Foundation
Concealer
Pressed powder
Setting Powder
Brow gel
Blush
Black Eyeliner/Black Eyeshadow
Lash Glue/ Bonding Glue
Light False Eyelashes/ Mascara
Dark Brown/ Dark Plum/ Black Lip Pencil
Pink Lipstick or Pink Lip Gloss
Clear Lip Gloss
Setting Spray
TOOLS
Beauty blender
Concealer brush
Small eye brush
BASE
Apply primer all over your face (including your eyelids) and work it into your skin
#faithtip Apply baby powder all over your face with a powder brush for a long-lasting oil-proof base
Apply concealer to your under eyes following your eyeshape
Blend well with a small brush
Apply tinted moisturiser or foundation to skin
Blend well with a damp beauty blender
#faithtip: dampen your beauty blender with setting spray for easier blending and a longer lasting matte base
Take a powder brush and some pressed powder and apply all over your face
Now, using a powder puff or a beauty blender, apply loose powder to your under eyes following your eye shape.
BROWS
Brush through your eyebrows with brow gel
Fill in if preferred
EYES
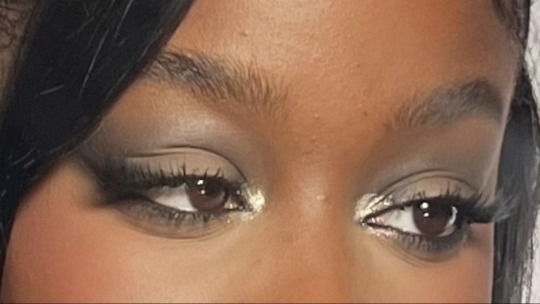
Use black eyeliner to follow/ enhance the shape of your eye
There are tutorials on this blog that feature how to draw different eyeliner wings for your specific eye shape
You can use a brush to make your wing look softer inside but keep the outer part of your wing sharp.
LASHES
If you wear light lash extensions these next steps can be skipped
Curl your lashes then apply mascara
If you prefer, after this step apply light cluster lashes to your eye
If you choose a light pair of strip lashes, apply the mascara after putting on the lashes
STRIP LASHES
But for this step apply glue to strip lashes
Wave the lashes around for a bit so the glue dries a tiny bit and feels a little bit sticky
Place them on the lash line and adjust where needed (using tweezers or fingers)
youtube
CLUSTER LASHES
Strip lashes can also be cut into smaller pieces or use cluster lashes
Dip them into glue and wipe off the excess
Use tweezers to hold the lashes
Pull the top of your eyelid upwards so you can see underneath your eyelashes
#faithtip Wipe the glue on the part you are applying to then you can dip the lash in glue again before actually placing it underneath your lash
This make the lashes more firm and secure
Make sure it is not too close to your eye as this can be irritating
Fan your eyes if you can still feel wet glue
youtube
BACK TO THE BASE
Using a powder brush, brush away/blend out the loose powder, under your eyes
Blend VERY well, as the powder has been sat on your face for a while, so it will not move easily
After blending, for a more highlighted look apply a lighter setting powder to the inner corners of your and allow it to sit for some time, whilst you apply blush to your cheeks/cheekbones
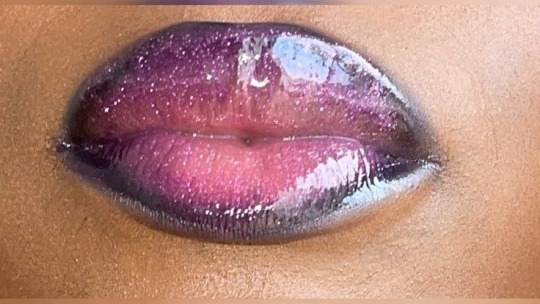
LIPS
A common hack from this time was holding a lighter slightly close to your lip liner to melt it a little bit, making it easier to apply and slightly darker
Line your top and bottom lip
Appy a pink lip gloss or lipstick in the middle
Go over your lip liner if you must
Blend your lip liner slightly
Apply a clear lip gloss or keep it matte in true 90s essence
FINISHING TOUCHES...
Swipe away the remaining setting powder
Spray setting spray all over your face
...and DONE! xx
#Youtube#cosmetics#cosmetology#makeup#black women makeup#90s#90s aesthetic#90s fashion#90s makeup#2000s#2000s makeup#early 2000s#2000s aesthetic#y2k aesthetic#y2k#y2k moodboard#girly#black tumblr#black girl aesthetic#girl blog#video vixen#90s fine#destinys child#black barbie#bratz doll#bratz aesthetic#y2k bratz#y2k blog#mcbling#toni braxton
563 notes
·
View notes
Text
THE GALA - A Clone Dating Sim
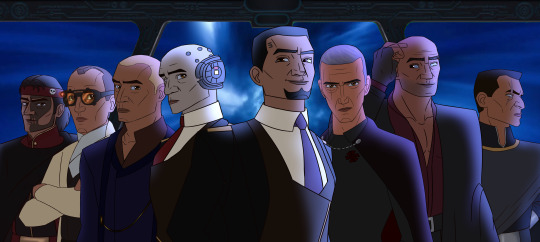
You are a Jedi General. The Council has assigned you a very important mission: the infiltration of a Separatist gala on Raxus. But you will not be going alone--you are allowed to bring a date on this adventure. In the heart of enemy territory, who will you count on to watch your back?
PLAY HERE: THE GALA
Ideal play experience is on desktop! (I think you can play on mobile it just looks a lil yuccy)
Clone bbs x Fem!Jedi player FEATURED CLONES: Sergeant Hunter, Tech, Crosshair, Wrecker, Captain Rex, Commander Wolffe, and ARC Twins Fives & Echo
RATING: 18+ MINORS DNI - The paths can be SFW or NSFW depending on your choices (2nd option is always the NSFW one!) - general warning for smut if you make those choices, more specifics below the cut!
Additional (less relevant) info beneath the cut!
HAPPY MAY 4TH! ENJOY MY LOVES~~

COMPREHENSIVE WARNINGS LIST: In general, lots of flirting, innuendo, pet names. Established relationship for all
Hunter: LOTS of flirting (he is a whore), p in v sex
Tech: Oral (f receiving)
Crosshair: Fingering
Wrecker: Not much for him honestly, implied canoodling (p in v), oblivious boy ♥
Captain Rex: dirty talk, praise, oral (m! Receiving)
Commander Wolffe: rough! p in v
Fives & Echo: Multiple clones (no clonec*st), lots of flirting, Echo is self conscious!
-ART ASSETS I drew all of the Clone art! I found the most nakedest screencap I could of any of them (SURPRISINGLY DIFFICULT) and then traced the base, then looked for Star Wars Male Fashion (WAY FUCKING HARDER) to draw on them and dress them up! I think for Hunter and Fives/Echo I just went crazy but for all the rest lmk if u can spot who I stole the outfits from, i deadass dont remember at this point For Background art I found them all on google images - from what I recall, it's mostly concept art and screenshots from games! -ENGINE I made this in Twine, an incredible tool for making text-based games! I highly recommend looking into it. It's really easy to use and there are a ton of tutorials online!

AN: Thank you so much for playing! Please let me know what you think, I had so much fun making this✨✨ it is so phenomenally cringe but I hope you all enjoy ♥ (also if you spot any bugs or typos, please feel free to let me know and I will fix!!)
TELL ME YOUR FAVORITE PATH I like Rex Crosshair Wrecker the best I think
"""taglist""" - @shinyshayminflower @starrylothcat @pb-jellybeans @jediknightjana
#tbb x reader#the bad batch x reader#star wars x reader#w6fic#wrecker x reader#hunter x reader#tech x reader#crosshair x reader#captain rex x reader#rex x reader#wolffe x reader#echo x reader#fives x reader#clone dating sim#fem!reader#i hope u enjoy playin as much as i enjoyed making :)#idk what else to tag this fr#the bad batch#captain rex
2K notes
·
View notes
Note
do u have a guide to drawing plus sized characters…ur ladies r so gonegous 👉👈
auauhhh *scrolls thru my unorganized foto album*


first ones a little ref on how i draw side profiles of big people (liquify tool helps if the fat parts look like theyre defying gravity hehoo)
second n third r how i draw different body types specifically fat n skinny
i hope these refs r gud im kinda buns at giving tutorials on anything ,,,
ive been drawing sinc like 5ever n my little obsession with anatomy helped me alot i think :3c
#tubbie refs????????#bwap#my art#ofc everybode hears this all the tike but i swar!!!#tracing real photos of people and looking at references help#whenever i had to draw a certain body part id search up a diagram of that part#and like a bajillion refs to go wit it so!!
214 notes
·
View notes
Note
can u maybe show some behind the scenes how u sketch out muzzles? or just heads in general? im trying to draw a dog specifically but really any animal would help lol
im currently in the middle of figuring out my style again, and im struggling with muzzles, myself :') i might make a tutorial once i get my bearings again, but in the mean time i can point you in the direction of one of my favourite reference tools!
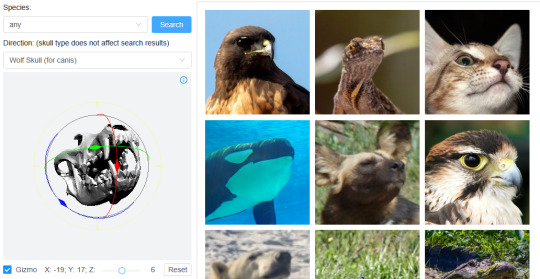
you can pose the skull at any angle and change the search to be specific species and it'll pull up images from google of animal's heads in that angle! LINK
i wish i had a more specific answer right now, i'll try to revisit this in the future <3
294 notes
·
View notes
Text
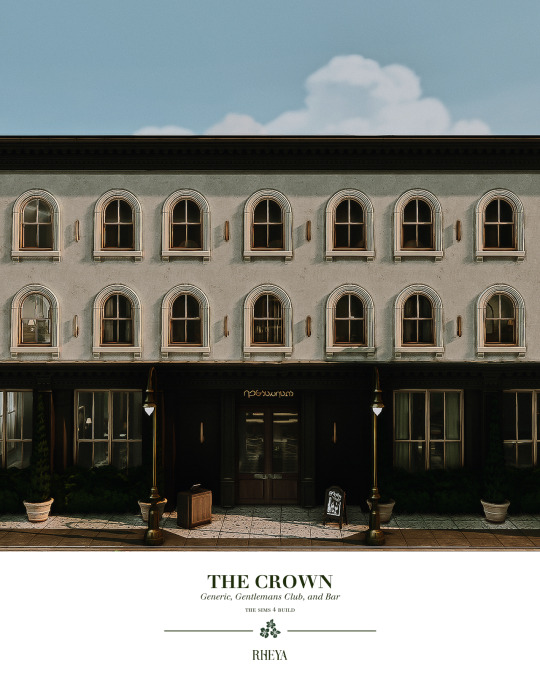
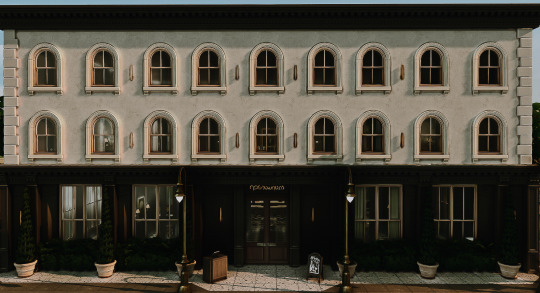


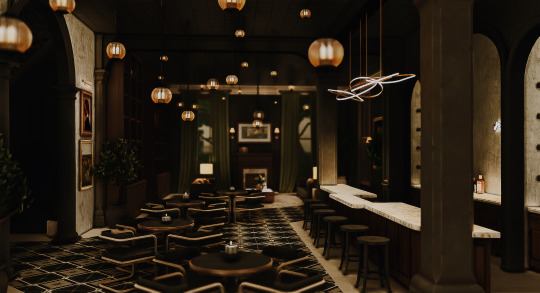
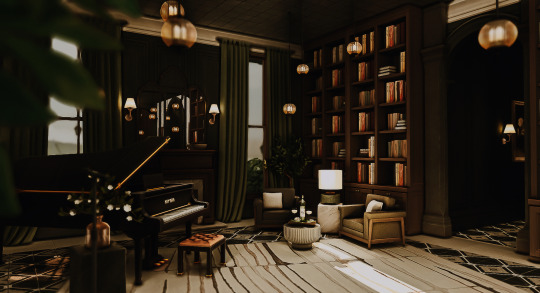

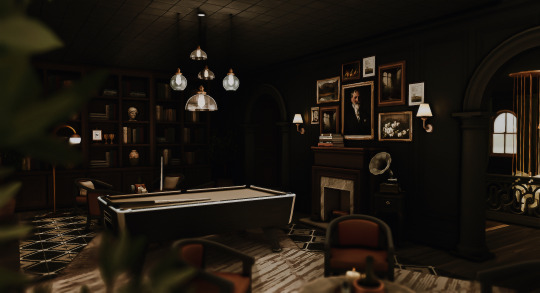
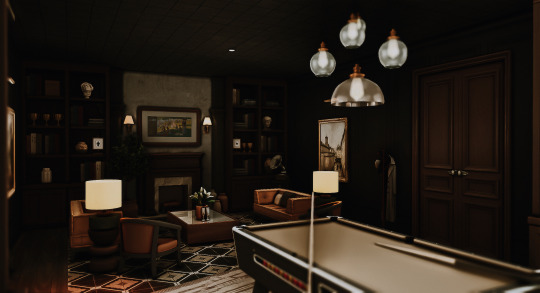

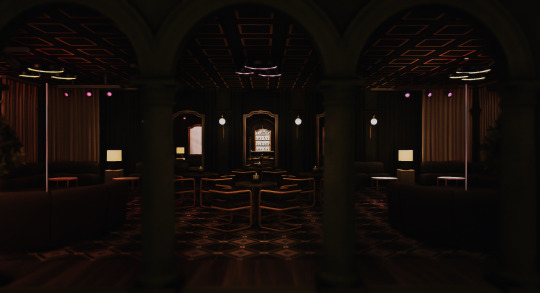

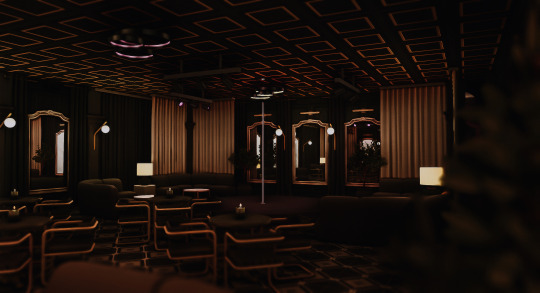

The Crown [ Lounge + Bar] ♥ The Sims 4: Speed Build // CC
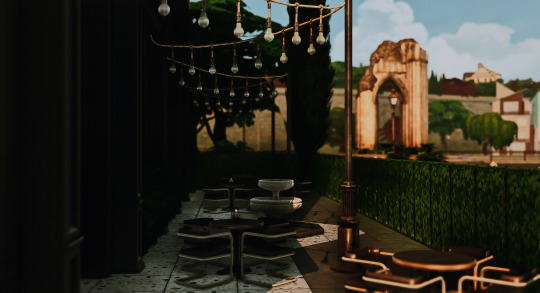
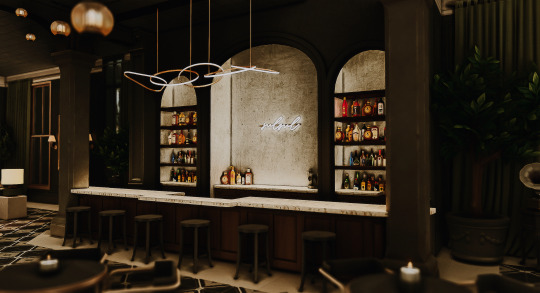
Welcome to The Crown, a haven of refined indulgence that seamlessly shifts from an upscale morning restaurant and lounge to a sophisticated evening gentlemen's club. In the daylight hours, experience culinary delights in an ambiance of polished dark wood accents, moody lights, and soft jazz.
As the sun sets, The Crown transforms into an intimate and stylish club, where discreet luxury meets thrilling entertainment. With an emphasis on sophistication, The Crown offers an unforgettable fusion of exquisite dining and sensual experiences in an atmosphere of opulence.
➽ Speed Build Video
➽ Rheya's Notes:
● In order for the adult club function to work, you must download the wicked whims mod [Download at your own risk]. ● This build does not have to be a club, it can be set as a restaurant, a lounge, or a bar. ● I am not 100% familiar with wicked whims so I will not be answering questions regarding the mod. However, I played around with it and did some playtesting as a club owner and everything is functioning correctly on my end. I advice that you look up tutorials if you're not sure to how this lot type works.
● Please make sure to turn bb.moveobjects on! ● Please DO NOT reupload or claim as your own. ● Feel free to tag me if you are using it, I love seeing my build in other peoples save file ● Feel free to edit/tweak my builds, but please make sure to credit me as the original creator! ● Thank you to all CC Creators ● Please let me know if there's any problem with the build
Sim's Featured in the video are by the talented @rhdweauni0 <3
➽ LOT DETAILS
Lot Name: The Crown Lot type: Gentlemen's Club/Str*p Club [Can be set as a lounge, restaurant or bar] Lot size: 30x30 Location: Windenburg or San MyShuno
➽ MODS
● Tool Mod by Twisted Mexi ● Wicked Whims by Turbodriver [optional: This is only required if you want to set this lot as a club] ● Functional Pool Table by Utopya
➽ CC LIST:
Note: I reuse a lot of the same cc in all my builds, specifically cc's from felixandre, HeyHarrie, Tuds, and Pierisim so if you're interested in downloading past, present, future build from me i suggest getting all their cc sets to make downloading a little easier! other creators include Sooky, Charlypancakes, Sixam, Thecluttercat, Myshunosun, awingedllama, Peacemaker. This will also ensure that the lots are complete and are not missing any items upon downloading ! CharlyPancakes ● Miscellanea [books] ● Soak [ Floor pattern, wall lamp] Amelie ● Vintage Art print #3 Severinka ●Aura Bedroom - Ceiling lamp V01, V03 ● Ceiling lamp Alpha ●Industrial Light II Ceiling B, Ceiling D Sooky ● Dark Academia Victorian Oil Paintings 01 ● Horizontal Oil Painting - landscape ● Horizontal Oil Painting - Still Life ● Vertical Oil Painting - Landscape ● Vertical Oil Painting - Portrait ● Vertical Oil Painting - Still Life The Clutter Cat ● Dandy Diary pt 1, 2 ● Hello Horses FelixAndre ● Chateau [all ] ● Berlin pt 1 ● Colonial pt 2, 3 ● Florence pt 2 ● Gatsby ● Georgian ● Grove [ all ] ● London Interior ● Paris pt 2, 3 ● Soho pt 3 House of Harlix ● Harluxe ● Livin Rum ● Orjanic Harrie ● Brownstone [all] ● Baysic ● Brutalist ● Coastal pt 2, 3, 8 ● Klean pt 3 ● Kwatei ● Octave pt 2 ● Shop the look pt 1, 2 ● Spoons pt 3 ● Jardane Kiwisim4 ● Block house dining [dining chairs] Lilac Creative ● The classic Collection Little Dica ● The even Grander Piano Myshunosun ● Garden Stories [patio lights] ● Lottie [candle] ● Simmify pt 2 [book clutter] Pierisim ● Coldbrew pt 3 ● Combles [chair] ● David Apartment pt 1, 2 ● Domain du close pt 2, 3 ● MCM pt 1, 3 ● Oak House pt 4 ● Tilable ● Winter Garden pt 1, 2 ● Wood Land Ranch pt 3 Plush Pixels ● Parisian Apartment [coffee table only] Simcredible ● Bossa Nova Ceiling lamp Simplistic ● Rusticlife area rug Sixam ● Boho Bathroom [floor tiles] Taurus Design ● Lilith Chilling Areas MycupofCC ● The Modernist [wall lamp] Tuds ● Ind Syboulette ● Ratatouille [Sign ] Utopya ● Pool Table [mod]
● DOWNLOAD Tray File and CC list: Patreon Page ● Origin ID: anrheya [previous name: applez] ● Twitter: Rheya28__ ● Tiktok: Rheya28__ ● Youtube: Rheya28__
#ts4#sims 4#thesims4#sims#thesims#showusyourbuilds#sims 4 cc#sims 4 screenshots#sims 4 builds#builds#sims 4 build#sims 4 interior#the sims 4 cc build#the sims 4 restaurant#simblr#sims 4 gentlemens club
2K notes
·
View notes
Text
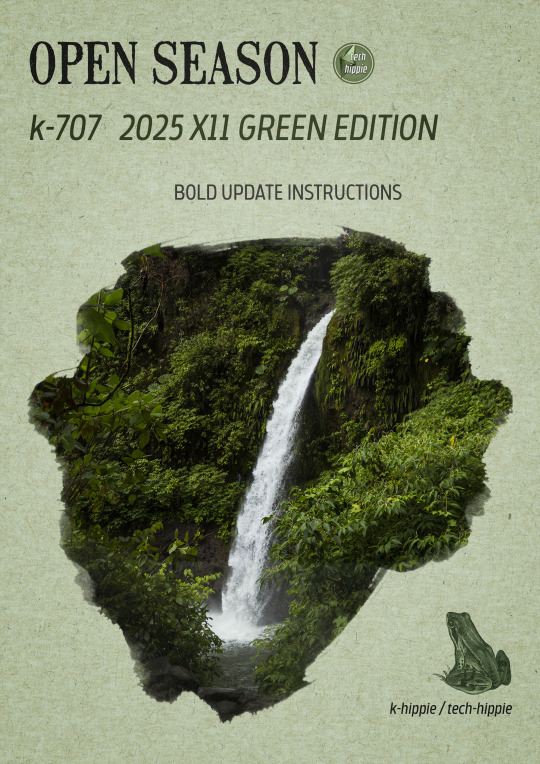
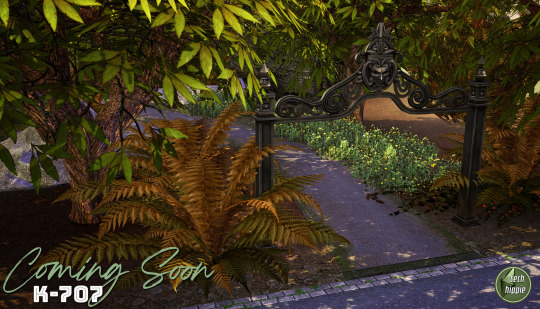
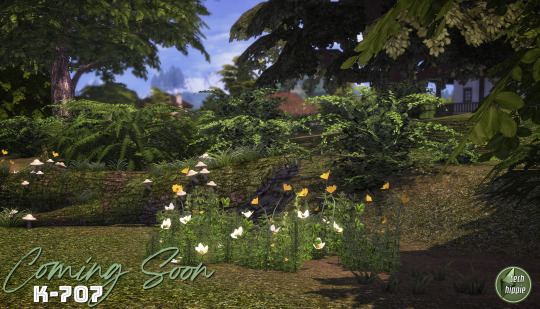
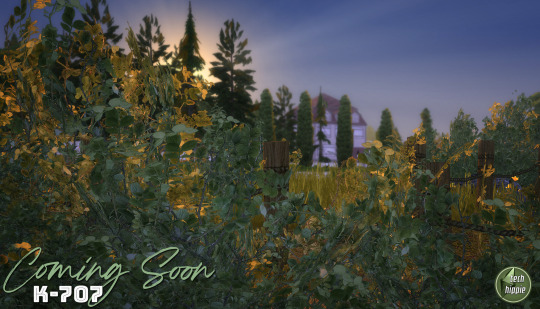
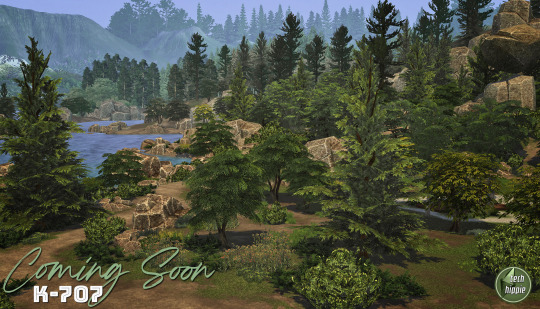
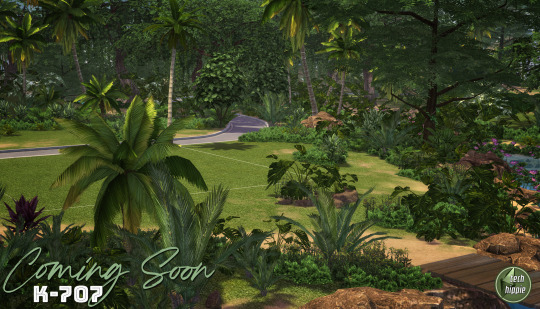
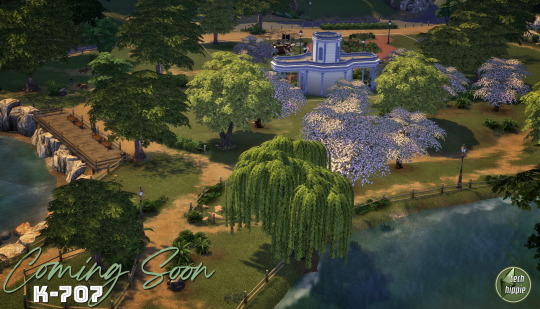
k-707 2025 BOLD UPDATE INSTRUCTIONS
Hello everyone :)
The new k-707 is going to be released in the coming days :D but as it is a kind of new experience, we have some kinda instructions in order to get everything working fine.
Step right up, folks, for the grand unveiling of our biggest project yet! The K-707 isn’t just a mod—it’s a green revolution. Taking on almost every flower, patch of grass, bush, and tree makes this even more massive than the K-505. And trust us, our brains are already feeling the strain! :D
But before instructions, let me tell you the k-707 story ;)
We really hope you'll enjoy it. We worked hard on it with 5 rules :
Replace EVERY tree of the game
NO overrides with crazy high polygons amount
Follow as much as possible the Maxis directions ( trees style )
Decrease amount of polygons where it is possible
No trees defying gravity and laws of physics
It took long for few reasons ...
At first, we always knew the first version was a vast experiment. When ea made its direct x11 update, it was time to make a bold update ... but we didn't want simply remove the non-strictly-dds-x2 images and replace them ... we wanted more. We always wanted more, even we are not kinda ea gurus :D ( hey EA ! don't you want hire some true creators with a long term vision of your game ? ) <- poll : would you like k-hippie as maxis creators or not ? :D
Joke apart, it was difficult. Almost 1 year long, we searched and searched solutions to get rid of all problems we met when replacing foliage on a debug tree, or modifying anything on a debug tree ( for info : we are not blender gurus nor sims 4 core users )
All we knew was few lines :
When cloning a tree, you cannot lose the any of the vert color data. I suspect whatever tool(s) you are using to do the cloning is losing this data, since this setup is somewhat unique to trees.
The vertex color layout for trees is as follows. Green and Blue are ignored for channels 1…4 : Color 0 RGB Surface color tint Color 1 R Rustle direction X Color 2 R Rustle direction Y Color 3 R Rustle direction Z Color 4 R Rustle phase ( game generates two wind scales that change over time, this term interpolates between the two )
The pipeline keeps the rustle information in a vertex color format for what the game engine will load, which means it’s in the range 0 and 1. The shader remaps this into a 0.5 to -0.5 range before scaling it and applying the offset to the leaves. Note that these directions are clamped but not normalized ( they’re allowed to be different lengths ) The WindMagnitude material parameter acts as a scaling factor.
So, we started with this information, begging in vain for some help, both inside the Sims community and outside ... but nobody helped us. And frankly, it interested no-one except us and our beloved followers :)
We found multitude of tutorials ( funny how many they are as soon as it is clothes related ) but nothing related to our specific target. We paused our research many times, made direct x11 updates for our other k-mods and so on. Until ... zaceitorius in July 13rd 2024
Who is zaceitorius ? We do not know. A simple member of sims4studio with 6 posts who gave us a simple bright clue which seems obvious after all, but yet very very precious indeed !
And here we are today. 300 trees and numerous plants later ... <- another reason why it took a long time :D
We made a lot of vertex experiments, we lost data colors, remade again and again some other experiments and well, we are still experiment, remake small details which seem important to us and so on ... And for now, it works :D And now you are warned : the k-707 is far from perfect.
And now, the instructions :)
The k-707 covers both trees & plants, both debug and lot trees & plants
What's new ? No more than usual. We tracked all the non-strictly-dds-x2 images, reshaped some trees ( such as the multitude of oaks ), added some flowers ( where we removed them in 2021 ) but kept many foliage we already did. We tried to simplify many details but added some others and replaced some plants.
How many stuff it represents ? We do not know. Many indeed. We stopped the count :D
Because of its size ( and our love for our sanity ), THE RELEASE WILL ROLL OUT IN PARTS ( not slowly but piece by piece ). If we waited until it was all perfect, you’d be seeing it around ( maybe ) September 2025 ... Let’s not tempt fate—or burnout! :D
The K-707 is neatly organized for your convenience :
Each DLC gets 2 folders : one for plants, one for trees.
The base game gets 4 folders ( a bit different since most of the greenery is drawn from there ) divided into lots and debug folders.
Expansions which have very few greenies ( City, Get to Work, University ) get the same folder named : k-hippie-k707-multi-greeny-2025
IMPORTANT :
Leave them in each of their folders ( or create your owns based on a similar methodology )
If you merge files : we can’t help troubleshoot if it doesn’t work anymore, so be smart ;)
You’re free to do as you like, but we strongly recommend keeping this tidy folder setup. If you need to troubleshoot down the line, it’ll save you a major headache.
And for the mavericks out there who love merging files—go for it, but know this : we won’t be able to help if things go haywire.
Now, we could wax poetic about how stunning the K-707 is, how every leaf, petal, and blade of grass is crisper, richer, and beautifully integrated into your worlds—but hey, we'll do it later, inside the release post :D
We could do more, more realistic trees and so on but we do not want integrate crazy high poly models. We do not want an unplayable game isn't it ? ;)
The k-707 is not yet finished. We got some more work to do on it, shape the last details, and some re-checks.
But here is what is new compare to the previous version : we kinda cracked ( a bit only ) the code. Trees swinging in the wind like it’s a dancing contest ? No more. Trees defying gravity and laws of physics by groveling into the ground ? No more. Just remember we do not have the hands upon the worlds construction, so, when trees are not into the ground, well, call your reseller aka EA itself ...
#sims 4 custom content#sims 4#sims 4 wysiwyg#sims 4 cc#k-hippie talk#ts4#the sims 4#k-hippie#k-mods#k-707#k hippie#k-505#sims 4 green#sims 4 expansions#sims 4 base game#sims 4 trees#sims 4 plants#ts4 overrides#sims 4 overrides
360 notes
·
View notes
Text
links & faq 🌞
Welcome and tysm for stopping by! 🌻🌻
You'll find all my important info condensed into this pinned post, which is all the places you can find me and some frequently asked questions 😊
✦ Ko-fi - free brushes, donations, and other downloadable goodies soon 💖
✦ VGen - commissions
✦ linktree - all my socials!
...
Do you accept requests/suggestions?
Yes! These might take a while before they pop up in my socials, but I'm always open for these c:
Do you do bases/poses commissions?
Yes I do comms too! Turnaround time is 2 days up to 2 weeks if I'm busy. Check my VGen link for more info!
How should we credit you when using your bases/pose references?
I require credit in these cases: when my bases are traced, drawn over, or used to do commissions. A tag/mention is enough 😊 If you’re using them just as pose reference there’s no need to credit me since poses are universal, but feel free to tag me if you want! I love seeing your drawings and appreciate it a lot 💖
Do you have tutorials/tips for drawing?
I've made one tutorial so far 😭 it's on my TikTok! Might do more in the future but I'm very slow, bear with me 🥹 Anyways, here's some tips I've shared before:
Doing timed figure drawing/art studies often (Line of action is a great tool for that). Don't think too much about making mistakes while studying, own it and move on; you'll start seeing the basic shapes and capture the movement of the pose more easily as you practice!
Read anatomy books, anatomy for illustrators specifically. Proportions and general shapes of the body are a foundation for everything else. Some authors and books I like: Gottfried Bammes, Michael Mattesi, Michael Hampton, morpho's books.
398 notes
·
View notes
Text
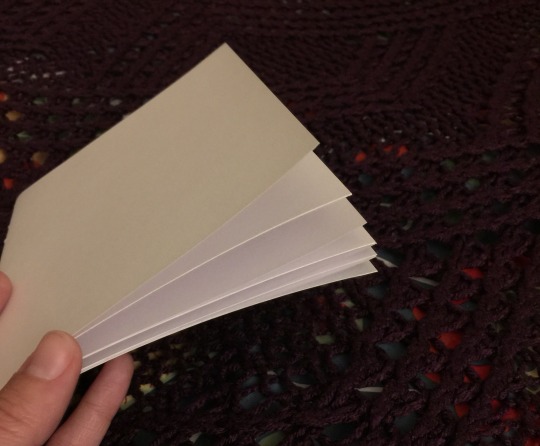
I've always wanted to learn bookbinding, ever since I was a wee little nerd, but there are a lot of things I've always wanted to learn, and this one has both a daunting upfront materials cost and a daunting upfront research cost. however, my sister is a jewel among siblings and gave me for christmas last year a handy dandy bookbinding manual, a block of good paper, and a little bag of tools.
but I still didn't have a suitable workspace, nor any of the many important tools and materials that she didn't include in her gift. so I just read the manual and pined. until maybe a month ago I got fed up with pining, flattened a cardboard box for a cutting mat, and went to town.
and I'm real proud of myself, so here's me rambling, plus photos!
I went to the thrift store and got glue + some fabric to bind the cover, went to Michaels for a paintbrush (and later went back for a metal ruler lmao it's amazing how useful it is to have a straightedge for cutting the paper), and...could not find material for the cover boards. so I went home and pined some more. but the urges were too strong, so after a couple hours of moping I got a stack of printer paper at the grocery store (I could not bring myself to use the good paper for my first, inevitably weak attempts, I just couldn't do it) and started making a little booklet. which was a great idea, it turned out, since it makes for good practice with cutting the paper, measuring things, punching holes in the signatures, etc.
I have a big box of greeting cards from Michaels, which I used for the covers. it didn't feel like I was making a Real Book, so I got some colored paper from the stationery store and used that for end papers.
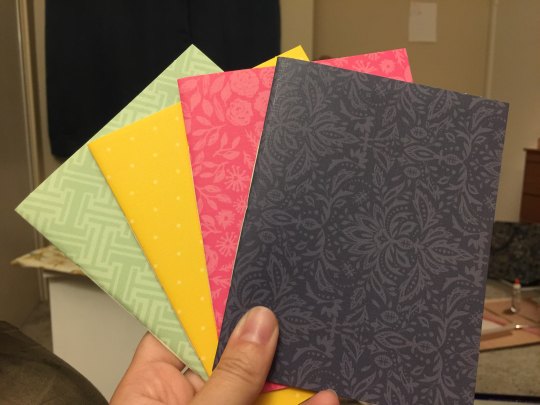
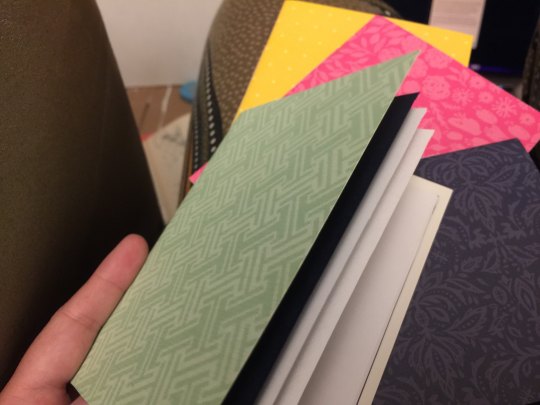
so fancy~
galvanized by this success, I ordered a stack of chipboard online to use for cover boards; and once I was confident that I could cut paper without making it look too stupid (getting that straightedge ruler sure helped lol), I made signatures out of the good paper, left them under some heavy books overnight since I don't have a book press, and then punched holes in them! (huzzah for this nice video on getting the holes right)
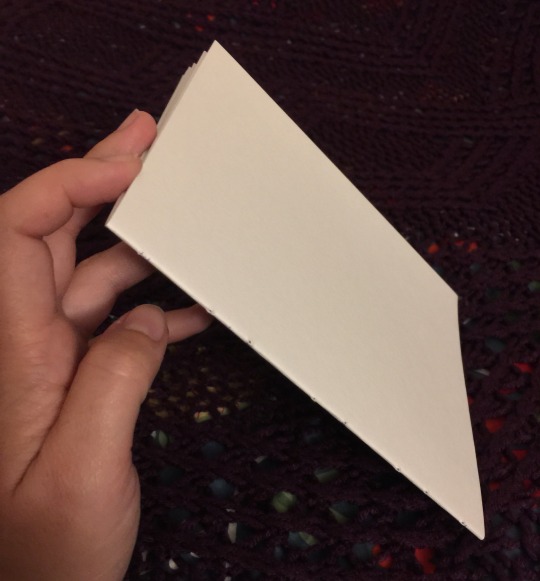
my sister's gift included good linen thread. it's unwaxed, but after some poking around on r/bookbinding it looks like that just means I'll have to be more careful to avoid tangles and keep good tension. I am fine with this. I can be extra attentive. (I considered just running it over a beeswax candle, but one commenter said if your wax has paraffin in it, it could melt in a hot car, ruining the spine. I can't guarantee my candle is 100% beeswax, I didn't make it, so maybe we just move on.)
I don't have good linen fabric to use for the tapes, but the important part there is that the fabric be thin, sturdy, and not stretchy. the probably-cotton I got from the thrift store fits the bill, so it'll do!

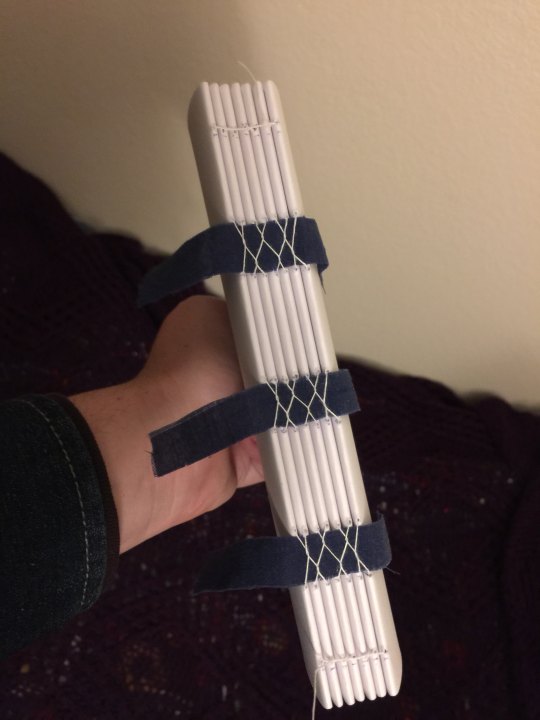
this is a french link stitch, which I got from this exceedingly good tutorial. apparently it's strong enough on its own that for a book of this size, I don't actually need tapes, but I'd already cut the things so eh here we are. and tapes plus french link will make it a stronger binding still (according to a friendly redditor on r/bookbinding), so we carry on.
specifically we carry on to the gluing step. now as I mentioned, I do not have a book press, and you....kinda need one for this step. you need to hold the book block in place with the signatures facing upwards, pressed together hard enough that the glue won't run down between them and stick the pages together (though you do want the glue to get between them just a little, just for like a 16th of an inch). you at least need some clamps and a couple boards to sandwich the book block with.
but you know what? I'm not a professional, this is my first ever book, if it's a little bit off it'll be fine. so we grab all the heaviest books off the bookshelf and improvise.
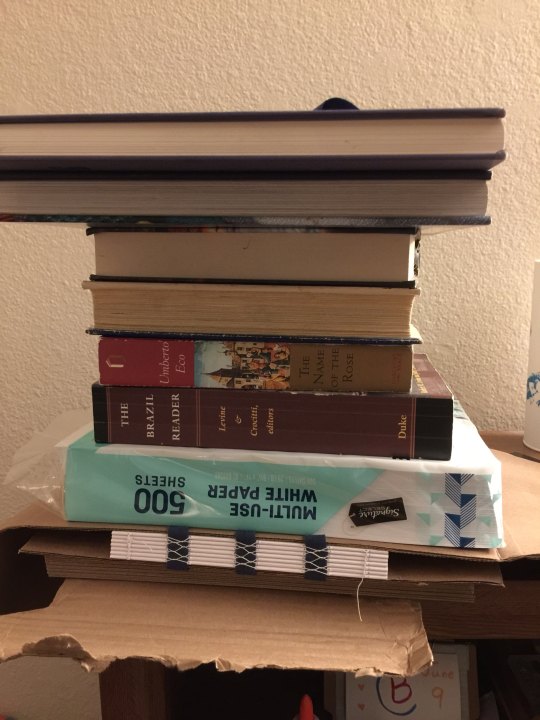
it's fine! I'm sure it's fine! and just in case it's not, I've tucked a bit of cardboard underneath to catch any glue that drips down so it won't land on the floor. see? I'm prepared! I'm acing this.
and actually, it really was fine. I used clear elmer's glue, applied with a flat paintbrush from the art supplies aisle at Michael's, and frankly I liked the way the flat paintbrush let me slip glue in between the signatures. I did poke around on a couple bookbinding sites to see what kind of glue I should use, and the gist is that although there are better options than this, elmer's glue is perfectly serviceable, and the main downside is it's not archival grade. but I don't need my first bookbinding attempts to last 200 years, that's fine.
the next step is to add the mull. mull is a specific type of fabric – extremely loose-weave linen – and the idea is to paste it down over the spine to essentially hold the tapes and signatures all in place in relation to each other.
but I don't have mull! so I'm using more of the thrift store probably-cotton, because it's thin enough and not really stretchy at all. I'm sure this will be fine too. I painted a layer of glue onto the spine, then left it to dry a bit while I measured and cut the fabric, then painted a generous stripe of glue down the center, where it'll affix onto the spine. then I added a bit more glue to the spine, just to be sure, and pressed the mull into place, rubbing it thoroughly to make sure it's firmly affixed to every signature, with no creases in the fabric or air bubbles beneath it.
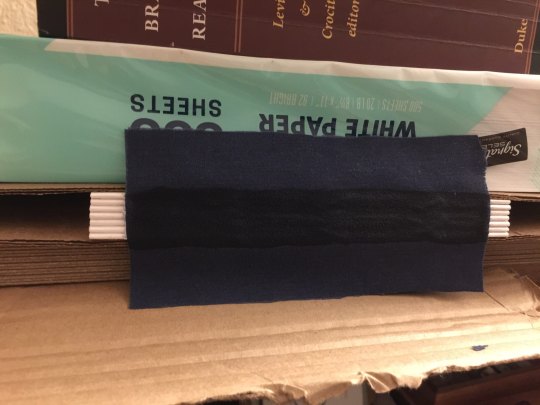
honestly I might have overdone it on the glue. I've never done this before, I don't know! I think it's okay, though – I tried not to ever let it become a thick layer, just a slight coating, since the danger of too much glue is that it might crack once dry and weaken the spine.
and now we leave it in the press overnight to dry, and pick up the next step in the morning!
#finx rambles#bookbinding#finx makes stuff#technically this is the second hardcover book I've made#but it's the first I'm making using Approved Techniques™#instead of watching a handful of half-relevant youtube videos and making up the rest#which was fun!#but did mean that once I was done I didn't know where to go from there#and at the time I couldn't find better resources#(I really wanted better youtube videos! just didn't know how to find them idk)#(it was 2020 I was unwell. as I'm sure we all understand)#but now I have an abundance of good sources#and I'm determined
585 notes
·
View notes
Text

Hello! I got an ask [x] for a tutorial for one of my recent gifsets for tgcf [x], so here it is, split into three parts:
Drawing a Curve
Template - optional: if you want the curve to flow throughout your entire gifset
Colouring - optional: specific to that particular gifset I did
Progressions
PART 1: DRAWING A CURVE
Trying this out as a screen recording for the first time since it's easier to show 🤡
PART 2: TEMPLATE
This part is optional and only applies if you want your curve to flow throughout all the gifs in your gifset. Of course, you can do your curves individually per gif, but it's generally better to have a template for how the entire curve will flow first so that the joining lines between each gif flow smoothly.
Create a new document for your template. For the height, calculate the height of the entire gifset, including the buffer areas between each gif (4px). E.g. for a gifset of 4 gifs, each of which are 540px in height, the total height would be 540px x4 gifs + 4px x3 buffers = 2172px
In your new document, go to View > Guide > New Guide Layout and change the number of rows to the number of gifs. Make sure Gutter is 4px.
In my case, for this gifset, I skipped step 2 and manually created the template for each gif instead, since every other gif has a different height.
Put in a single frame of each scene in your template (see image below).

5. Club the layers according to which gif they will be in, apply the corresponding layer masks for each gif, and draw your curve that will flow through all 5 gifs (see image below). The reason for doing this (having the previews of the scenes in at this stage) is so that as you're drawing your curve, you have a better idea of where it will flow.

6. Duplicate the curve such that each group (i.e. gif of your gifset) has one such curve layer.

7. When you're ready to edit your actual gif, import your scene into Photoshop and duplicate the layers for that particular gif to your imported document. You may need to shift your duplicated layers or crop your file to the right size.

PART 3: COLOURING
The colouring for this gifset is pretty straightforward since everything is in black and white.
1. Import all your scenes and position them accordingly. Add a mask on your curve layer so that you can mask out the parts of the curve you want to be "hidden under" your scene - so that your curve looks like it's interacting with your scenes.

2. These are the usual adjustment layers I use for black and white colouring, but it's up to you to use what you prefer or are familiar with. Play around with the numbers for each adjustment layer to see what works best for the particular scene.

3. Slap on a crumpled paper texture for an added grunge effect.

4. Colour the remaining scenes and done!


PART 4: OTHER GIFS THAT ALSO WORK THIS WAY
Progression 1: curves flowing to organic shapes
set: [x]
Using the same Curvature Pen Tool, but this time with the fill on, to create shapes first. Then, link up the shapes with lines.

Progression 2: flickering curves and organic shapes
set: [x]
On top of Progression 1, draw 2-3 variations of your curves and shapes and lay them out chronologically on timeline so that you get this flickering effect.

117 notes
·
View notes
Text
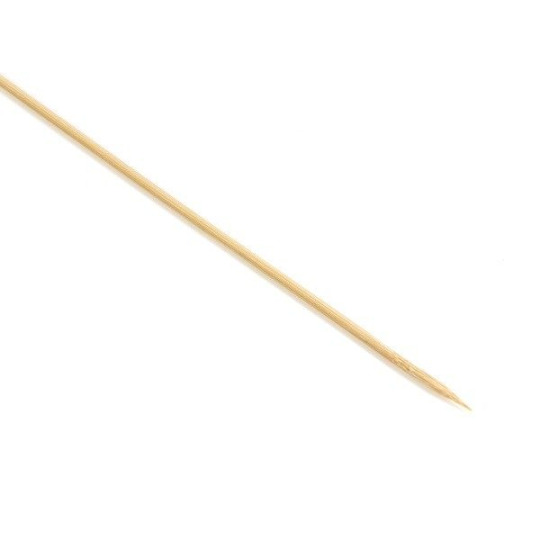
Amigurumi/Crochet Toy 101 + Resources
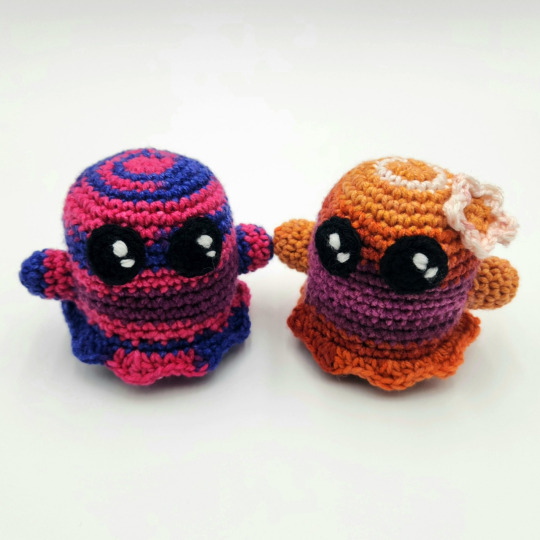
Noticed a couple folks in my tags mentioning that they wanted to learn or wished they knew how to crochet amigurumi. So here's a quick and dirty little how-to guide with resources I threw together? Hope it helps!
Tools + Materials
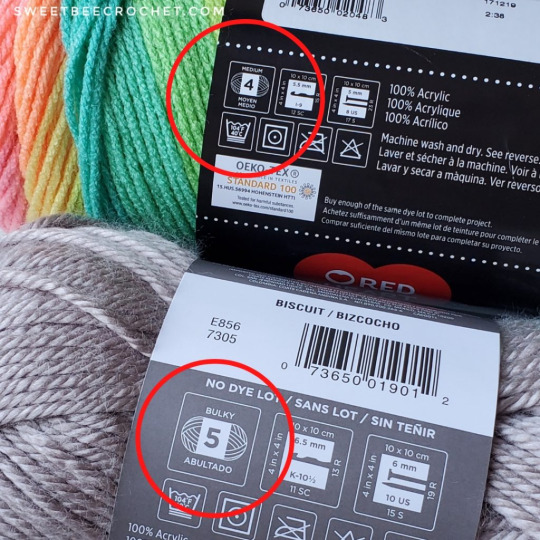
Crochet is one of those hobbies that is actually relatively cheap to get into. Here is a basic list of what you'll need to get started. You can find most of these at any craft store or even Walmart.
(1) Yarn (Required)
Yarns come in a variety of weights (sizes) and fibers. I recommend a soft, worsted weight acrylic yarn (indicated by a number "4" and "medium" on the yarn label) for your first few projects.
Image
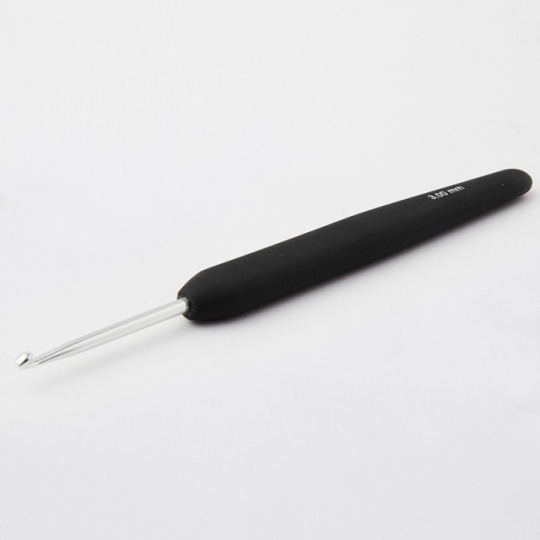
(2) Crochet Hook (Required)
These come in a lot of sizes and styles, and what size you'll use will depend on your yarn weight and how tight you want your stitches to be. I'd recommend buying just one hook to start with rather than a larger set. Metal hooks with ergonomic rubber handles are easiest for beginners (and on your wrists longterm, lol). A 5.0 MM/Size H or a 4.50 MM/Size G works best for making amigurumi with worsted weight yarn.
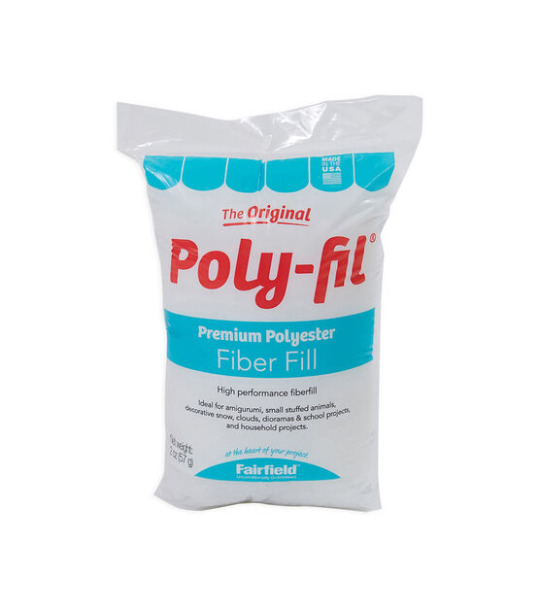
(3) Polyfil/Stuffing (Required)
For stuffing your project.
(4) Yarn Needle (Required)
Most crochet projects require sewing to one degree or another. Yarn needles are distinguished from regular sewing needles by their larger size, larger eye, and blunter tip. Yarn needles may be straight, or they may be angled at the tip (i.e. a darning yarn needle).

(5) Scissors (Required)
Any sharp, medium-sized pair of scissors will do for cutting your yarn.
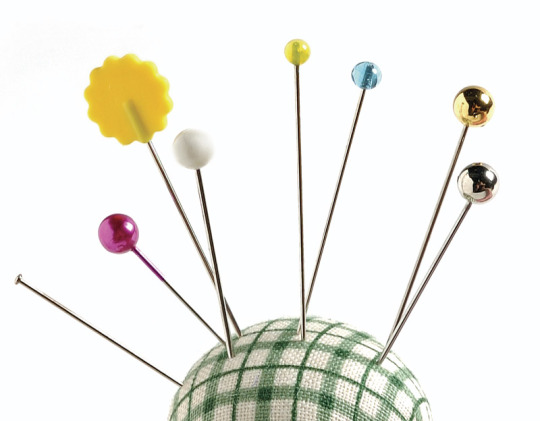
(6) Sewing Pins (Recommended)
For holding parts in place as you sew them on.
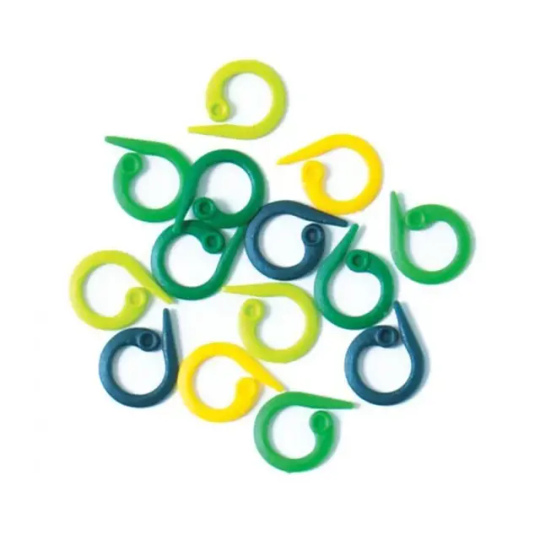
(7) Stitch Marker (Recommended)
Many amigurumi projects are worked in rows of continuous rounds, and stitch markers can be used to mark the beginning or end of these rounds. They can also be used to mark areas of interest in your project or to secure your project to keep it from becoming accidentally unraveled. I strongly reccomend getting split ring ones. Scrap pieces of yarn also work in a pinch as stitch markers.

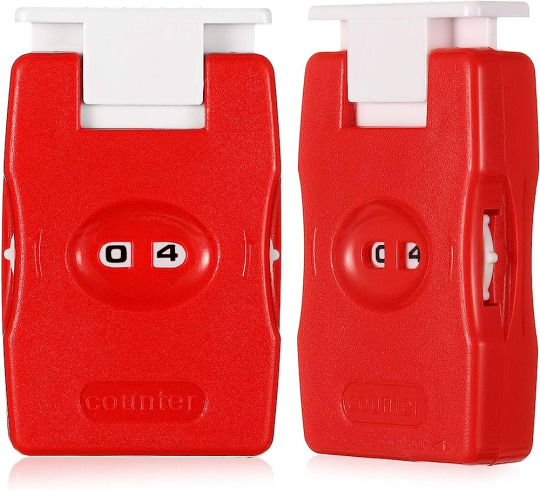
(8) Counter (Recommended)
For keeping track of your rows as you work a pattern.
(9) Safety Eyes (Recommended)
Most amigurumi will require eyes of some sort. Safety eyes (you can find these in various sizes in the doll section of any craft store) will give your project a polished look, but you can also use buttons, felt, or even embroider the eye details on your amigurumi.

(10) Stuffing Stick (Recommended)
For getting your stuffing into hard-to-reach spots. A chopstick or wooden skewer works very well for this.
Basic Crochet Stitches + Amigurumi Techniques
Most crochet patterns are built from a few basic stitches. Before attempting any larger project, I recommend getting comfortable with these stitches by making a few small, flat pot holders out of each basic stitch. A lot of crochet is pure muscle memory and practice, and this is a great way to start.
There are also a few techniques specific to making amirugumi that will be helpful for you to know. You can find any number of free videos/tutorials online. Below are links to a few videos that I found helpful when I was learning to crochet.

Image
How to Make a Slip Knot
Single Crochet (+ Starting Chain and How to Count Stitches)
Half Double Crochet
Double Crochet
Triple Crochet
How to Keep Starting Chain from Twisting
Magic Ring
Ultimate Finish
Invisible Finish
Invisible Decrease
Beginner Amigurumi Patterns
These were the first three patterns I learned in the process of teaching myself how to make amigurumi. I recommend working them in the order they are listed. The first two links have step-by-step instructional videos and will help ease you into learning to read amigurumi patterns. All of these patterns are free, and there are many more free patterns out there as well. Have fun!
Amigurumi Ball
Amigurumi Whale
Amigurumi Stegosaurus
3K notes
·
View notes
Text

Fully Underwater Lot Tutorial
@creida-sims @kitkat99
UPDATE January 2025
There is now a much, much easier way to do this. This version of SimPE now includes a tool to change terrain geometry. To edit the terrain in SimPE, go to Tools/Neighborhood/Neighborhood Browser and load your neighborhood. In the Resource Tree, select Neighborhood Terrain Geometry (NHTG) and select the only resource in the Resource List. In Plugin View, click Terrain Editor. It's very intuitive, but basically, you can edit the terrain under a lot to make it be underwater. You can also delete the road with the Road Editor.
I'll keep the old tutorial for archival purposes, but unless you can't or don't want to install this version of SimPE, it is pretty much obsolete.


Some warnings and disclaimers
1. This is not a beginner tutorial. I have tried to explain with as much detail as I can, but still, if you just started playing The Sims 2 I recommend trying out other building tutorials first.
2. I have tested it but there's always a possibility that some new problems will come up. Follow at your own risk. Backup your neighborhoods before trying this. Test it first in a new empty neighborhood.
3. These lots are roadless, so they require specific gameplay conditions to avoid breaking immersion (pun intended).
4. They will behave like normal lots in the sense that sims can walk around and do anything as if they were on land. There's one big problem to consider: when sims go fully underwater, their hair and some parts of their clothing might disappear visually.
So this is more useful for structures that sit above the water, shallow water that doesn't reach a sim's head or, with some modifications, small islands surrounded by water. So unless you want bald mermaids, I don't recommend this for sims that live underwater.
5. If you use Voeille's hood water mod, reflections will look glitchy in lot view, because this is technically not a beach lot. The only solution I found is enabling "Lot view ocean reflections" in RPC Launcher. Otherwise you'll have to deal with glitchy reflections.
6. Before following this tutorial, make sure you know the basics of creating, editing, importing and exporting SimCity 4 terrains. Written tutorial by SimEchoes here, video tutorial by loonaplum here.
Software and mods used
The Sims 2 FreeTime expansion pack (required for the modifyNeighborhoodTerrain cheat)
SimCity 4 (required) Hood Replace by Mootilda (required)
Lot Adjuster by Mootilda (required)
Portal revealer by Inge Jones (required)
Voeille's pond and sea water overhaul and RPC Launcher (optional, see disclaimers)
The Sims 2 Apartment Life and Bon Voyage expansion packs (optional, for "walk to lot/work/school" options)
Cheat codes used
moveObjects on/off
modifyNeighborhoodTerrain on/off
1. Creating/editing a terrain in SimCity 4
1.1. You can edit an already existing terrain or create your own from scratch. In both cases, you need to keep two things in mind: If you want the usable area of the lot to be underwater, such as making houses for mermaids or a coral reef, make sure the water is shallow. No more than a few short clicks with the terraforming tools in SimCity 4. This is because The Sims 2 live mode camera won't go underwater, so making the water too deep might make it uncomfortable to build or play the lot.
If you goal is to build a structure mostly above water, like a ship or an oil rig, you can get away with making the water a bit deeper, but not too much. I've noticed that sometimes the lot terrain tools stop working correctly if there a hill that's too steep.
1.2. Once you've created the terrain, you will need to add a small island on the area where your lot will be. I know it seems contradictory, but trust me, it will make sense. Create and name your city. Use the terraforming tools in city mode to make a tiny island of about 6x2 squares.

1.3. On the island, use the road tool to place a straight road that takes up 4 squares. Then, using the street tool (the last option), place two short streets at each end of the road.
Streets will disappear in TS2, only roads translate to roads in ts2, so why do we place them? Well, placing a street at the end of a road will get rid of the rounded end bit in TS2, which can't be used to place lots. This will be important for the placement of the lot and to make sure the edges of the lot are underwater. If this doesn't make sense yet, don't worry, it might make sense later.
1.4. Save the terrain. Don't exit SimCity 4. Copy your new/edited sc4 terrain from your SimCity 4 folder to your SC4Terrains folder in your Sims 2 documents directory. It is usually
"C:\Users\YOURUSERNAME\Documents\EA Games\The Sims 2 Ultimate Collection\SC4Terrains"

1.5. Back in SimCity 4, we're going to make a second version of this terrain. Remove the roads and streets you made before, with the bulldozer tool. With the level terrain tool in Mayor mode, carefully remove the island, so it's on the same level as the bottom of the ocean/lake. Don't change anything else. Save, exit and copy this second terrain to your Sims 2 SC4Terrains folder. Make sure you rename the file to something different from the first one, like adding "no roads" to the filename. You should have two terrains by the end of this step. One with the small island and one without it.
2. Editing the terrain in The Sims 2
2.1. Open The Sims 2 and create a new neighborhood using your new terrain. Something to keep in mind: if you want the terrain to be a subhood of another neighborhood, make it a subhood from the start. You will not be able to move the lot once it's finished, since it will be roadless. I don't recommend decorating the neighborhood for now. Leave it empty until the end of this tutorial.

2.2. Place the smallest empty lot (3x1) on the island.
2.3. In neighborhood view, open the cheat console by pressing Control + Shift + C, and type
modifyNeighborhoodTerrain on
To quote The Sims Wiki:
"This allows you to alter the neighborhood terrain by raising or lowering it. To use this cheat, be in the neighborhood view, then enter the cheat "modifyNeighborhoodTerrain on" (without the quotation marks), and click over the area you would like to change. To select a larger area, click and drag the cursor to highlight the desired area. Press [ or ] to raise or lower the terrain by one click, press \ to level the terrain, and press P to flatten terrain. When you're finished, type “modifyNeighborhoodTerrain off” in the cheat box (again, without the quotations)."
If you use an English keyboard, these instructions will probably be enough for you. If you don't, I recommend first testing the cheat, because the keys for using this cheat are different in other languages. For example, in my spanish keyboard, the question marks are used to raise and lower the terrain and the º/ª key flattens it.
Another aside: When you select an area using this cheat, a green overlay is supposed to show up. Some lighting mods make this green overlay invisible, like the one I use. If that's your case, you kind of have to eyeball it. Remember that one neighborhood grid square in TS2 is equivalent to 10 lot tiles, or the width of a road. I recommend getting a mod that allows you to tilt the neighborhood camera on the Y axis, which will allow you to have a bird eye's view of the terrain.

2.4. Flatten the terrain around the lot so it's at water level. This cheat won't allow you to edit the terrain inside the lot, so you have to edit the terrain around the lot. Make sure there is plenty of flat underwater space around the island. You should end up with something like the picture above. The water will have some holes, but don't worry, those get filled with water the next time you load the neighborhood.
2.5. Enter the lot and place any object on it. Save the lot and exit the game. This is so LotAdjuster recognizes the lot in the next step.
3. Expanding the lot with Lot Adjuster
3.1. Open Lot Adjuster and select your neighborhood and lot.

3.2. Click "Advanced…". Check "Over the road (only enlarge front yard)". Use the arrows to add 20 tiles to the front yard. Click "Finish" and "Restart".

3.3. Select the same lot again. This time, check "Add and remove roads". Uncheck the road checkbox for the front yard. Add 20 Tiles to the back yard, 20 tiles to the left side and 10 tiles to the right side. Check "Place portals manually". You should end up with a 60x60 lot, which is the biggest size. You might want a smaller lot, but unless you know what you are doing, I recommend starting with this size. You can shrink it later. The goal of making the lot this big is making sure the edges of the lot are underwater. Click "Finish" and exit.
4. Moving portals and flattening the lot

4.1. Make sure you have the portal revealer by Inge installed in your Downloads folder before the next step. Open your game and load your neighborhood. The lot should look something like the picture above.

4.2. Load the lot. Delete the object you placed before. Place the portal revealer on the lot near the mailbox/phone booth and trashcan. It looks like a yellow flamingo and you can find it in Build Mode/Doors and Windows/Multi-Story Windows catalogue. You will notice that when you select the object from the catalogue, some yellow cubes appear on the lot, and when you place the object, the cubes disappear. After placing the portal revealer, pick it up and place it again. This will make the yellow boxes visible again.
So what are those yellow boxes? They are portals. They determine where sims and cars arrive and leave the lot. The ones on both ends of the sidewalk are called pedestrian portals, and in the street, one lane has portals for service vehicles (maids, gardeners, etc.) and the opposite is for owned cars and carpools. You can see the portal's names if you pick them up. Make sure not to delete any of them.
Now, since this is going to be a roadless lot, ideally there won't be vehicles in it. This means that the lot would ideally be accessed through walking only. In community lots, this would not be an issue if you have the Bon Voyage expansion pack, which allows sims to walk to lots.
In residential lots, you might run into some problems. Service NPCs always arrive on vehicles, and unless your sim owns a vehicle, the carpool and school bus will always come to pick sims up for work/school. It might break your immersion to have a vehicle show up underwater or on a ship. There are many options to avoid this: having sims work on an owned business instead of a regular job, not having kids on the lot, making the kids homeschooled, avoiding calling service NPCs… it depends on how you want to play the lot. For example, my icebreaker is a residential lot, only adults live there, some sims live in it temporarily and none of them have a regular job.

All of this is relevant because we're going to move the portals. Where you move the portals depends on you. Think about how you're going to use the lot. In my icebreaker, I placed the car portals (which won't be used) underwater, on a corner of the lot. I placed the pedestrian portals on the ship, to pretend that the walkbys are part of the crew or passengers. But for now, just move the portals, mailbox/phone booth and trashcan to a corner of the lot. To be able to pick up the mailbox/phone booth and trashcan, use the cheat moveObjects on. Delete the street and sidewalk tiles using the floor tool (Control + click and hold left mouse button + drag).


4.3. Flatten the island with the level terrain tool. Save the lot. Almost done! Don't mind the hole in the water, this will be fixed. You will notice that in neighborhood view, the island is still there. This is because the neighborhood terrain under the lot hasn't updated. I don't know why this happens, but it does. Normally, moving the lot would fix it, but we can't move this lot using the game's tools. Instead, we are going to fix the terrain with Hood Replace. Don't exit the game yet.
5. Updating the terrain with Hood Replace
5.1. Create a new neighborhood using the new roadless terrain. Make sure it has the same type of terrain (lush, desert, etc.) as the first one. Again, name it "NO ROADS" or something similar. Exit the game.

5.2. Open HoodReplace. On the left column you will select your "NO ROADS" neighborhood. In the right column, select the neighborhood that has the underwater lot. Check these settings: Replace terrain, replace road, and versioned backups. Leave everything else unchecked. Click Copy.

5.3. Open The Sims 2 and load the neighborhood to check if the changes worked. That concludes the tutorial. At this point you can shrink the lot if you don't want it to be so big. Remember to move the portals to their final placement when you're done building the lot. Also keep in mind pedestrians (walkbys) always walk by the mailbox, so keep the mailbox accessible for sims.
If you're going to have multiple underwater lots, I recommend making them first, and decorating the neighborhood after. Doing this in an already existing neighborhood might be more difficult, mainly because, if you made any changes to the terrain using the modifyNeighborhoodTerrain cheat in the past, they might get reset when using Hood Replace.
155 notes
·
View notes
Text
Clan Culture Illustrations
So I've been mentioning this in passing, and I think now is a good time to start collecting info from people who are interested!
I'm seeking artists who want to draw stuff for my Clan Culture series.
I often write very large guides for things like tools, ecology, medicine and treatments, etc, which then get held up by the fact that they're big blocks of text without any fun pictures. I usually collaborate with friends and family, but I could put out more quicker if I had some artists on standby.
If you're an artist who would be interested in illustrating, here's the details;
Everything I make on this blog is tailored towards WC fans, but free for anyone to use and reference for their xenofiction worldbuilding projects. You do not have to be intimately familiar with the Warrior Cats books. This offer's open to anyone above 18.
Fans of Better Bones are preferred, because Clan Culture and BB often intersect. I might ask for help with some BB stuff at some point, too. (for example i have a guide on types of StarClan spirits that needs illustration)
To re-iterate, please only inquire if you're 18+
Price range is 20 - 50 USD and turnaround time can be up to 6 months if you just keep me updated. (I am sorry that I can't offer a higher price for these, but this is coming from my own pocket. In return, this is meant to be low pressure)
Half payment upfront, the rest after completion.
I will never "assign" you a surprise mystery topic (unless you ask for that I guess?), I'll either present you with a list of posts that need illustration (yes this means you get to read stuff early), OR float some ideas that play to your strengths and interests. (for example: if I'm approached by Spider-Enjoyer-9000 who's willing to draw a ridiculous number of spiders, I will draft, write, and research a Clanmew Expansion in the style of Deer and Co or Moths and Butterflies.)
Either way, there's usually a lot of creative freedom here unless I need a specific technical drawing, which I will discuss with you and provide references for. (As an example, if we were talking about a post on declawing, I might ask for you to illustrate the muscles within the paw.)
The nature of Clan Culture means you will probably be asked to draw plants, food, objects, and/or scenery
Still interested?
I'm hoping to make a personal "list" of people I can call on, so send me your commissions info or details in a DM, an ask, a reply to this post, or anything else you'd like. Tell me about stuff you like drawing, topics you're interested in, if you can draw backgrounds, etc
Also, please tell include in that message if you're comfortable with illustrating these particular sensitive topics. These are opt-in only;
Medical Gore (Woundcare, stitching, blood, vomit, urine, parasites and bug bites, etc.)
Reproductive Care (Abortion, birth, pyometria, inducing lactation, possible revamp of the HRT guide including simple surgeries, etc)
Hunting and Butchery (Humane killing of prey, skinning, disembowelment, cutting meat, making sausage and blood pudding, etc)
Funerals and Animal Death (Sad kitties, dead battle cats, scavengers and grave desecration, tombs and burial rituals, concealing decay, etc.)
The end art will always stay tasteful, but I might need to give you references in the form of real images or tutorials that might be upsetting if you're sensitive to these topics-- so it's important to me that I consider those four things "opt-in."
I have plenty of other posts that need illustration, it's just a huge plus if you're able to do these too.
(You should also mention any other specific triggers or phobias you have, so I don't unwittingly come at you with something else upsetting)
"I still have questions!"
Putting a big list of answers beneath the cut;
"Would everything have to be colored?"
Nope, as long as there's pictures to break up the text, you can do sketches, black and white, flat colors, only put color in the header, etc. We'll discuss expectations with the post in front of us, and then agree on price.
I have ONE requirement; it's gotta look good on Tumblr darkmode. Because I use Dark Reader.
"Do you have a Discord?"
I do, I just try to be exclusive with who I give it to! When we're discussing details, we'll probably move over there if you'd like. This is a reason why I only want to work with 18+ artists, I'm not always SFW on main.
"Can we do an entry together about (specific topic)?"
Probably yes, so feel free to ask! The worst that will happen is that I say no, or maybe later. For example, I've got a post on Sweetness Tolerance reserved for my partner (they like to draw sweets), so I would say no if you asked.
Just keep in mind that researching, outlining, and writing is unpaid labor I'm doing completely for free. I have posts mostly done that just need art, and topics I've done some research on. Please only ask for special collaborations from scratch if you're serious 🙏
"Does it have to be digital?"
You'd have to have a WILD idea for me to say yes to anything non-digital, but I am a queer of whimsy. If you can whimsify me with an idea, hell yeah.
"Will I be compensated if you need any changes?"
Yes. If I spring anything on you after the details we agree on, I will first ask you, then ask how much that change would cost, and then compensate you for it.
As fair warning though, I am trying to stay within a budget and writing the posts themselves is unpaid work I do (plus occasional helping hands during research stages, I consulted a friend who is an irl wetlands expert for ShadowClan's environment). I can't pay more than what we agree on.
"Can I link my info in the post?"
Yes. "Guest Artist" is going to be named in the opening paragraphs, along with any fundraiser, shop info, carrd, etc, you want there.
"Boosty?"
Yea I got Boosty. Paypal, too.
"I have some other question about pricing"
Feel free to ask, but my hard budget is 20$ - 50$ US. Please only inquire if you're willing to charge within that range.
"What if I'd do it free or I want to do this anonymously?"
I'll donate to a charity of your choice and link to it in the post. If you have no charity preference, I will link to RAINN, Anera, or The Trevor Project.
(Naturally this comes with an anti-ghoul caveat or two. If you try to get me to donate to something like Autism Speaks I will rotate every bone in your body by 45 degrees.)
"I like checklists, can you give me a checklist of info you want in a DM?"
Sure!
Your info; socials, carrd, shop, etc
General interests and strengths. Stuff you'd love to work on, or have insight to. If you like fishing or drawing bugs, I want to know that. If you particularly want to practice flowers, tell me. Be as detailed as you want so I can pair you with a relevant subject!
Your examples
General asking price (or charity)
Which, if any, of the four Opt-In Subjects you're opting in for.
Anything else I should know (triggers, phobias, things you dislike drawing, if schooling or disability means you need a particularly long turnaround time, etc)
#bone babble#If other questions pop up I'll add em slowly#Seeking commissions#Clan Culture#This would probably start up in a couple of weeks but collecting this info now is useful#If you're curious-- right now there's a HUUUGE one on Shadow's cultural overhauls#A really old one on flax processing that needs to be rewritten#One about parasites. Another on spiritual entities.#And a plan to answer like 30 individual asks by wrapping them all up in Woundcare 101#My ask count is close to 3k btw
170 notes
·
View notes